Mastering Adobe Illustrator's Text-to-Vector Technique: A Comprehensive Guide with Sequential Steps
Adobe Illustrator's Text-to-Vector tool can simplify the design process for both beginners and professionals, transforming basic text into intricate vector graphics that can aid creative brainstorming or act as a preliminary mockup for clients. Whilst the tool's output is unlikely to be suitable for final projects, it offers an accessible, fun, and engaging way to explore design possibilities. This tutorial provides a step-by-step guide on how to utilize the Text-to-Vector tool effectively.
Guide to Using Illustrator's Text-to-Vector Tool
Accessing the Text-to-Vector tool
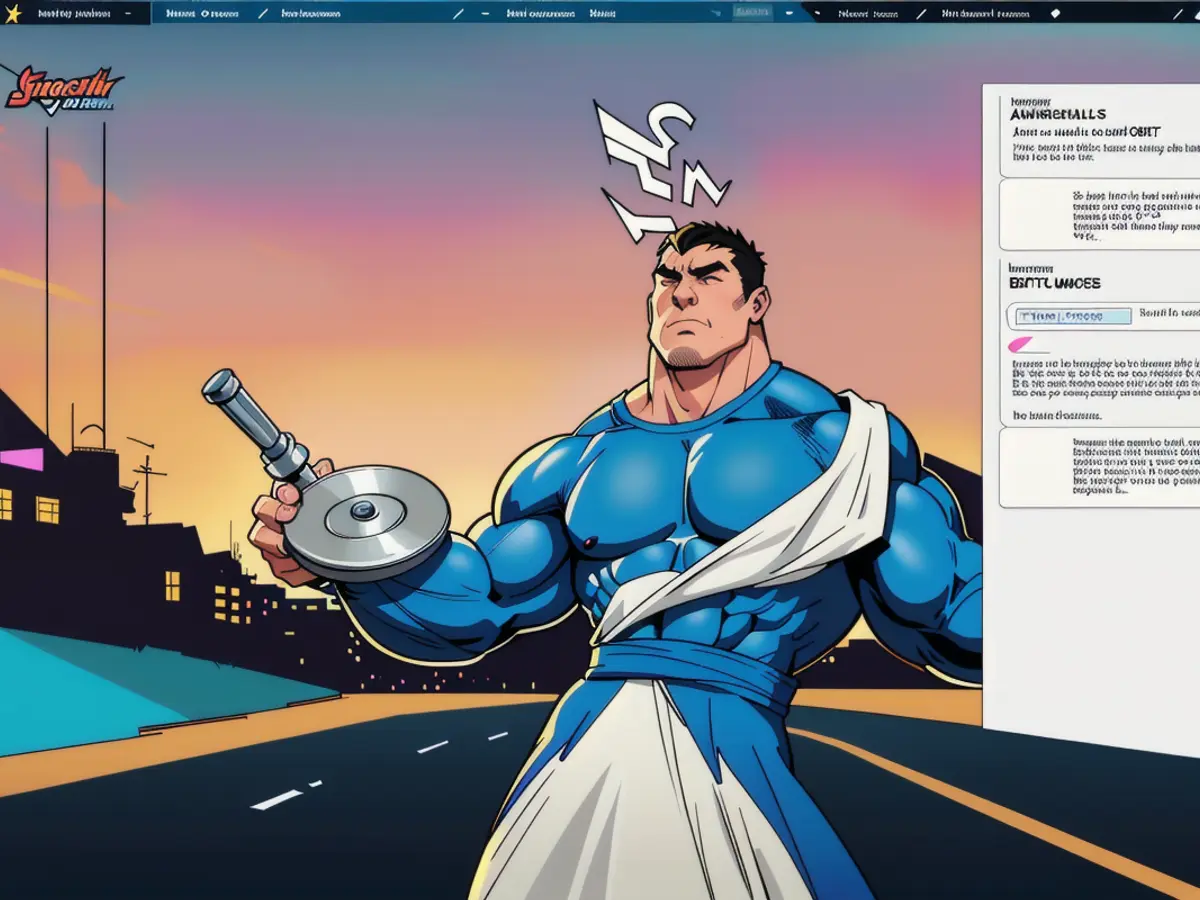
First, open the Text-to-Vector Graphic panel by navigating to "Window" in the main menu and selecting "Text to Vector Graphic." Alternatively, activate the Contextual Bar by going to "Window" and choosing "Contextual Bar." This will remain visible while working on the artboard. Begin by outlining the shape for your design, as the result will be a scalable vector graphic.
Selecting Object Type
Once you have enabled the Text-to-Vector tool, you will have the option to create one of four items: Scene, Subject, Icon, or Pattern. For an illustration, starting with Scene may be preferable, since it offers a sense of space and perspective.
Entering Text Prompts
Add as many descriptive text prompts as necessary to guide the creation process. More information provided will generally lead to better outputs. Consider the setting, style, time, and level of detail for your graphic. For instance, you might type "Art Deco, colorful mountain landscape at dusk with a treeline, road, and snow." If you wish to replicate the style of a pre-existing artwork, you can place it on the canvas and reference it using the Style Picker tool. Moreover, the Properties panel offers sample prompts and a slider to adjust the level of detail (defaults to 3/5).
Reviewing and Generating Vector Graphics
Pressing the "Generate" button will yield three unique results that you can browse through. Although some outputs may appear lacking, do not forget to rate your results. By providing continuous feedback, the tool will improve in quality over time. If the generated vectors do not meet your requirements, simply press the "Generate" button again to create new graphics, or refine the text prompts to modify the generation parameters. On each press, you lose some credits from your Adobe account, but there is no need to worry about running out, as you will still be able to utilize AI tools albeit at a slower rate.
Building Your Scene
To enhance your graphic, you can incorporate additional objects or characters that will conform to the active artboard style. Gathering suitable elements may require trial and error, and a willingness to adapt your vision will help in the process.
Cleaning Up Your Graphic
If you are only using this tool for rough storyboarding, you may now be finished. However, some vectors may prove to be rough, so it is advisable to clean them up by removing unwanted elements or adjusting shapes and colors as needed.
For more information, consult our detailed Illustrator tutorials or explore available graphic design software options, including Adobe Creative Cloud deals. Additionally, subscribe to our newsletter to receive daily design news, reviews, how-tos, and more, handpicked by our editors.
- The Text-to-Vector Graphic panel in Adobe Illustrator can be accessed through the main menu by selecting "Window" and then "Text to Vector Graphic."
- To create an illustration using the Text-to-Vector tool, starting with Scene may be beneficial due to its ability to offer a sense of space and perspective.
- The Style Picker tool allows users to replicate the style of a pre-existing artwork by placing it on the canvas for reference.
- There are four items that can be created with the Text-to-Vector tool: Scene, Subject, Icon, or Pattern.
- Gathering suitable elements for your graphic may require a willingness to adapt your vision, and the process may involve trial and error.
- Cleaning up your graphic may be necessary to remove unwanted elements or adjust shapes and colors as needed.
- For more insights on graphic design and to explore various software options, including Adobe Creative Cloud deals, check out our detailed Illustrator tutorials or subscribe to our newsletter.

